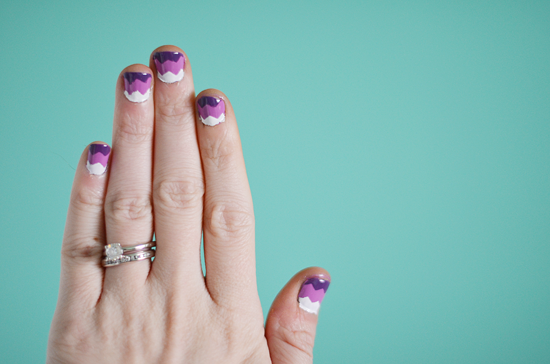
During mine and Elycia's blog weekend we worked on a cute little nail tutorial. While it does take some patience (drying time) it's super easy and perfect to do while you watch a movie in the evening. Let's get started...
♥ three different nail polish colors ♥ tape ♥ pinking sheers
1 // Use your pinking sheers to cut out ten strips of tape. You're going to want the tape to have been cut on both sides so it has zig zags. *Tip* press the piece of tape to your (clean) hand before you cut and apply it to your nail so it's easier to use and not so sticky!
2 // Paint your nails one solid color, and let dry completely.
3 // When your nails are 110% dry apply the small piece of tape across your nail in the middle so that there are equal areas not covered on the top and the bottom.
4 // Using which ever color you'd like next paint the bottom portion of your nail. It's easiest to start from the bottom of your nail and paint slowly and steadily up to the tape.
5 // Now paint the top part of your nail starting from the top of the tape to the tip of your nail.
6 // As soon as you get done painting take the tape off quickly in one solid pull. If you do it slowly it might pull up some of your newly painted polishes. Now repeat with the rest of your fingers and after that's all dry seal it up with a top coat. My favorite is seche vite!
Let us know if you have any questions and send us pictures if you use the tutorial, we love to see your color combos! I know I have about a million more I want to try! ;)
xoxo
2 // Paint your nails one solid color, and let dry completely.
3 // When your nails are 110% dry apply the small piece of tape across your nail in the middle so that there are equal areas not covered on the top and the bottom.
4 // Using which ever color you'd like next paint the bottom portion of your nail. It's easiest to start from the bottom of your nail and paint slowly and steadily up to the tape.
5 // Now paint the top part of your nail starting from the top of the tape to the tip of your nail.
6 // As soon as you get done painting take the tape off quickly in one solid pull. If you do it slowly it might pull up some of your newly painted polishes. Now repeat with the rest of your fingers and after that's all dry seal it up with a top coat. My favorite is seche vite!
green and blue combos by me, black & white and purple combo by Elycia.
Let us know if you have any questions and send us pictures if you use the tutorial, we love to see your color combos! I know I have about a million more I want to try! ;)
xoxo


No comments:
Post a Comment